WoodenuKnow.com is a participant in the Amazon Services LLC Associates Program, an affiliate advertising program designed to provide a means for sites to earn advertising fees by advertising and linking to Amazon.com and may earn from qualifying purchases.
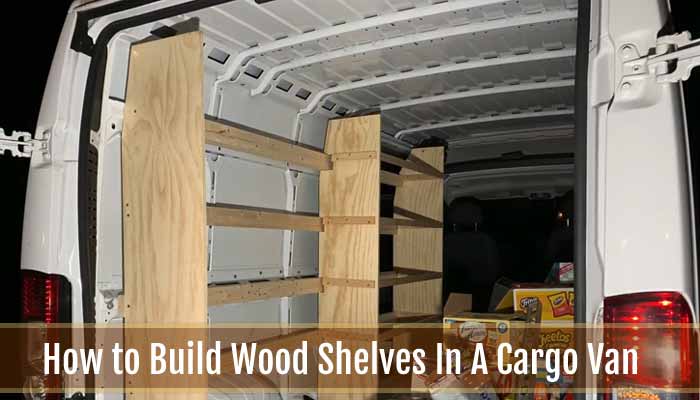
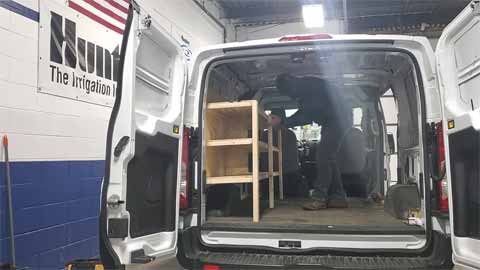
Do you want to maximize your cargo space while living on the road in your van? Here’s how to build wood shelves in a cargo van to give your van a bit of a homey feel. Consider this DIY project and have a place to store bikes, camping gear, or anything too big for a backpack.
This van conversion process is prevalent among the owners of a camper van, cargo trailer, utility trailer, or box truck who like to store bikes, camping gear, or any other cargo that is too big to carry on one’s back. So, let’s get started!
Why Should You Build Wood Shelves in a Cargo Van?
Wood shelves in the back of your van or truck are a great way to maximize space and give you a place to store your camping gear, bikes, etc. Another reason for van shelving is that it gives you more room for other things.
What are the Benefits of Building Wood Shelves in a Cargo Van
The shelves are perfect for storing bikes, camping gear, or any other cargo that is too big to carry on your back.
Van racking will give you the space you need to store other valuables like your bike or camping gear.
Wood shelves make it easy to find the items inside without having to root around and unpack everything.
The best way to fit storage places in your van is by using the walls and ceiling as much as possible.
This DIY project gives you a place for storage by van shelving while still allowing you plenty of room inside the van. You can use plywood, which is more vital than regular wood if the shelves are carrying anything heavy.
Another Resource: Easy Tips for Storing Plywood
What are the Measurements for Shelving?
The measurements for this project are 1 foot by 1 foot per shelf. For example, if you want two shelves, the size from one side would be 2 feet by 2 feet. The gaps in between will depend
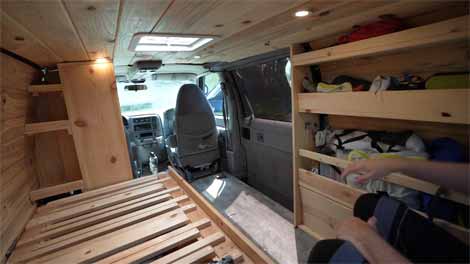
Some of the benefits of wood shelves in a cargo van or truck are that they provide you with space to keep your things, and they can be a great DIY project. Wood shelves also allow for maximum utilization of your cargo space, which is excellent for those living on the road. In addition, wood shelves make vans feel more like home because of the materials used in their construction. Other benefits include they are easy to install and cost-effective.
Materials Needed for Building Wood Shelves in a Cargo Van
You will require the following materials to get started.
- Plywood
- Screws for wood
- Square or circular saw
- Hammer
- Sandpaper or sander (optional)
- Stain of your choice (optional)- 2×4 boards or similar wood pieces
- Measuring tape and ruler
Time Requirement for Building Wood Shelves
The average time to build wood shelves in your van or truck is about a day if you have everything ready and prepared (including sanding the wood, staining it, and building the shelves!)
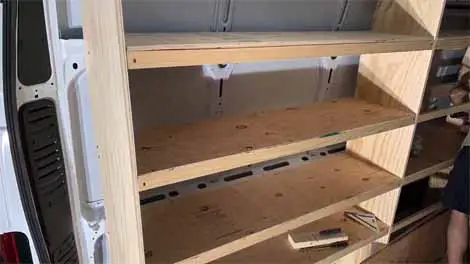
Steps to Build Wood Shelves in a Cargo Van
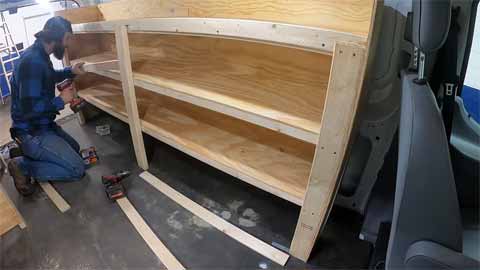
Step 1: Measure the distance for your shelving unit or shelving system and then measure that distance out onto plywood.
Step 2: Use a square or circular saw to cut out two pieces of plywood.
Step 3: Take one piece of wood and place it horizontally on the ground
Step 4: Place the other piece of wood on top perpendicularly so that they are about an inch apart
Step 5: Drill in screws to hold together the two pieces of wood
Step 6: Repeat steps 2-5 until you have all desired shelves built
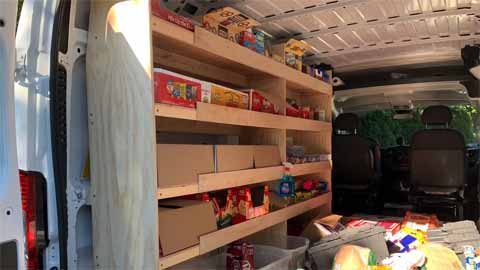
Step 7: Place your shelves into the van and store your valuables!
If you will cover them with fabric or carpet, make sure you find the right ones that fit your van first. You can get wood closet organizers for vans and RVs.
How to Build Wood Shelves in a Cargo Van?
- Make sure the shelves fit together nicely by measuring the distance between them. To do this, mark a straight line across the plywood. Then measure the distance between your marks. Repeat this process for each shelf.
- Make sure that your screws are aligned in a way that will help them hold the shelves together. You can drill holes into pieces you are joining and put in screws or nails first before placing a piece of wood on top.
- This process will help each shelf stay together as you move them around or when they are being used.
- Make sure your wood is thick enough to hold up the weight of the heavy cargo you want to store on the shelves.
- Make sure your wood is level so that you don’t have any gaps between the shelves. You can use a t-square or wooden ruler to make certain the frames are straight.
- Your measurements should be accurate to make sure the shelves fit together nicely and are placed in a way that won’t cause any issues or gaps.
- Use the materials provided by your van manufacturer to ensure your shelves don’t break apart from weight or exposure to elements like sun and water.
- Measure the height of the shelves before you start. This process will allow you to make sure they are placed in a place that makes sense and won’t block your vision as you are driving.
Safety Measures to Follow
- Be mindful of your surroundings and use caution when drilling screws into wood
- Measure the distance for your shelving and make sure it isn’t too short or too tall. Nails will damage the wood more quickly than screws, so you can repair nail holes with putty or glue if they are not visible
- Don’t place your wood shelves in direct sunlight or in areas where they will be exposed to water from rain or flooding. Check the wood regularly to make sure that it isn’t warped, cracked, or damaged.
- Use the provided support materials in this DIY project to ensure you are safe and that your shelves don’t break apart while carrying heavy cargo.
- Always wear gloves while handling the wood, and be careful not to drop tools onto your fingers or feet.
- Sand the wood after you cut it so that the rough edges don’t hurt your hands or feet when walking by the shelves.
- Always use your safety equipment when operating dangerous tools like a saw or drill. You can also wear safety goggles to make sure you don’t get any rogue wood pieces in your eyes
- Make sure you have enough space under the shelves and over your head for you to walk around while you are building. You don’t want to hit your head on any pieces of wood, so make sure your measurements are correct and have the proper tools ready for the job.
- Once your shelves are built, make sure you properly secure them into place and use proper screws or nails to hold them in.
- Secure your shelves to the walls of your van with screws or nails. Be sure that they are secure enough so that they don’t fall apart when you are moving them or if anything is placed on the shelves.
You Can Also Read: Easy Way to Remove Finishing Nails
Additional Works After Building Wood Shelves in Your Cargo Van
Now that you have built the wood shelves in your cargo van, you might want to take on some other DIY projects of van build to feel like home. Check out these 5 DIY projects below to get some ideas:
- Paint: Painting your wood shelves is a fun way to personalize and give character to your van. You have the option of painting your wood shelves in either color or with a white primer so they can be easily painted over when you are ready to change colors. Then, when not the primer dries, paint over your shelves with any color you want.
- Mount a USB charge station: For charging all of your devices while traveling, think about installing a USB charge station. All you need is a USB port and an extension cord with two outlets.
- Install LED rope lights: You can use these for atmosphere lighting or add some light when working on projects at night without having to reach for the switch.
- Mount a mirror to the ceiling: Get yourself a sturdy mirror, and use some screws to secure it into place. This process is convenient for ensuring you don’t have any food or items in your teeth while driving in the dark.
- Install a solar panel to charge your battery: Solar panels allow you to harness the power of the sun and charge any electrical devices directly from your van.
Also Read: Simple Method to Strip Paint From Wood
Conclusion
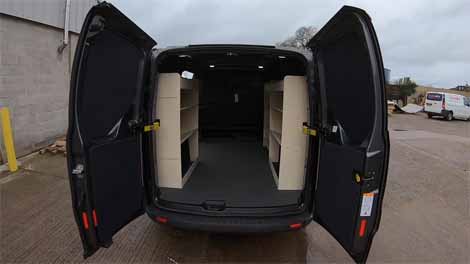
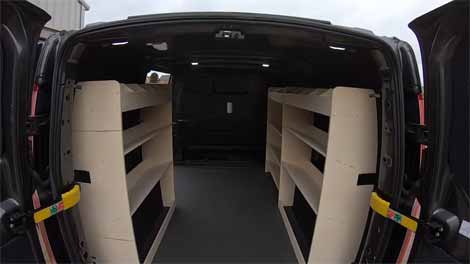
Now that you have a better idea about building wood shelves, you can ensure this project is done correctly. You can maximize cargo space with this DIY project and it’s a great way to make your van feel like home while living on the road. Follow all of the tips included in this DIY guide so that you are safe while working on your van.
If you are still having a difficult time, check out your local hardware store for more ideas and helpful tools. Remember all the safety precautions included in this guide and you will have a fun time building your van shelves for less than $100.