WoodenuKnow.com is a participant in the Amazon Services LLC Associates Program, an affiliate advertising program designed to provide a means for sites to earn advertising fees by advertising and linking to Amazon.com and may earn from qualifying purchases.
Installing shelves using brackets is an old-fashioned method. A modern home will not look good with this approach. Instead, shelves without brackets present a seamless and clean appearance.
It will make any room appear more elegant. However, installing shelves without brackets can be tricky if you don’t know what you’re doing. Fortunately, there are several ways to accomplish this task.
We will explain how to put up shelves without brackets that even beginners can easily execute. Read on to discover several different methods and steps for installing shelves instead of using brackets and making your room look more attractive.
Methods on How to Put Up Shelves Without Brackets

The shelves which are attached to the wall without brackets are known as floating shelves.
In the case of floating shelves, there are various ways to fasten them without brackets.
We will demonstrate several ways to hang floating shelves without brackets that are popular and effective. Let’s get started!
Method 01: Using Floating Shelf Kit
Using the floating shelf brackets kit is the easiest and most common way of installing shelves instead of using brackets. This kit is designed for that purpose. It consists of metal brackets that are hidden within the shelves. This kit provides hidden support.
One part of the shelf has a long rod that can be inserted directly into your shelves. Another part of the tool has a hole that connects directly to the wall. Following are step-by-step instructions for installing shelves using a floating shelf invisible bracket kit:
What Tools and Materials are Required?
In order to complete this task, you will need to gather some materials. By gathering these materials, you will be able to complete the project efficiently. Here are the materials that you require:
1. Floating shelf kit
2. Drywall anchors
3. Wall studs finder
4. Level
6. Drilling machine
7. screwdriver
8. Hammer
9. Pencil
10. Support pins
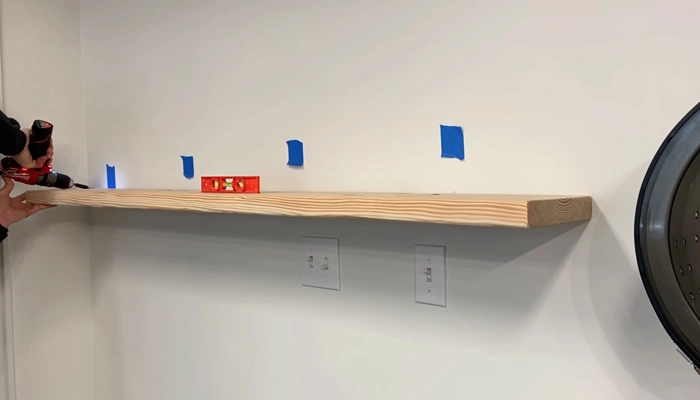
Step 01: Plan the Location
It is necessary to plan the location of your floating shelves before the installation process. Otherwise, it will be difficult for you to handle all aspects during installation.
You can use the wall studs finder to determine the location of the wall studs. This will help you to hang your shelves properly.
Step 02: Marking the Spots
After determining the location of the wall studs, you will be able to mark them properly. You can use a pencil for marking.
A pencil will allow you to make a clear mark on the wall. Place the floating shelf hidden brackets toolkit or ledge bracket in the desired location on the wall studs, then mark the spots where the shelf will be placed.
Additionally, you need to mark the shelves where the long rods of the floating shelf invisible bracket kit will be installed.
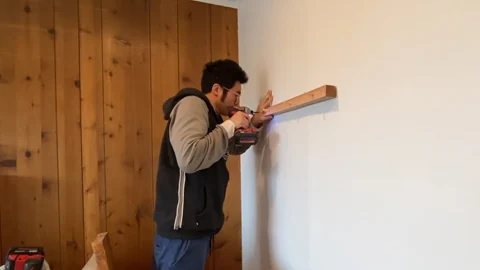
Step 03: Drill Holes
After marking the spot, you will need to drill holes for the installation. You can use a drill to make vents in the wall where you made the markings. Be careful not to drill too deeply or too shallowly.
Proper depth is necessary for making good mounting vents on the wall. You should also drill holes in your shelves according to the diameter of the long rod. This will ensure that the rod fits properly.
If the hole is too large, then the rod will not be able to fit. On the other hand, the shelves will not be stable if the hole is too small.
Step 04: Attach the Wall Anchors
In order to install your shelves, you will need to screw the right wall anchor to the drywall.
First, insert the wall anchor in each hole you have made in the wall and on your shelf. You can use a hammer for this purpose.
However, you should be very careful when using a hammer. Remember, the goal is to secure the wall anchor without damaging them.
Step 05: Secure the Floating Shelf Invisible Bracket Kit
Next, you will need to secure the floating shelf hidden brackets kit or ledge bracket to the wall. You can use support pins to secure the floating shelf kits to the wall.
The pins should be at least three inches long. You will need a screwdriver to secure the sturdy support pins in the wall. Ensure that the pins are securely fastened to the wall.
If the pins are securely attached to the wall, your shelves will be more stable. Otherwise, they will not be able to support the weight of items.
Step 06: Install the Shelves
Finally, install your floating shelf hidden brackets toolkit by inserting it into the long rods. If you have installed it correctly, your floating shelf should be able to sturdy support the weight without any difficulty.
Additionally, the shelf should be secure enough to hold items. Make sure that the shelf is at a comfortable height. You may also want to install your items before attaching your shelves to ensure they are properly fastened.
Method 2: Put Up Shelves Using Ropes
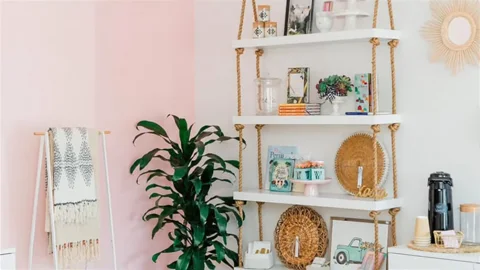
Having examined the wonderful method of installing floating shelves, let us look at another cool method that utilizes ropes.
This is an excellent alternative as it can be used as a way to make your shelves look very modern and chic.
Tools and Materials That Will Be Required:
It is necessary to acquire certain tools and materials in order to complete this project. This will enable you to complete the task more effectively. Here are the tools and materials that will be required in order to complete this task:
1. Tape measure
2. Pencil
3. Drilling machine
4. Rope (nylon, sisal, or raffia any one of them will do)
5. Screwdriver
6. Hammer
7. Ceiling mounting angle screw
8. Wall anchors
9. Ladder
Step 01: Decide on the Location
This method requires you to first determine where you want your shelves. This will enable you to put up the shelves in the right place. Ensure that there are no obstacles around the area you have decided on.
Step 02: Make all the Measuring and Marking
It is necessary to measure the area to get an accurate idea of where you need to drill through. In order to do this, you will require a measuring tape.
It is necessary to determine the length and width of your shelves. Next, you must measure the ceiling to meet the same specifications. Following that, you will mark the ceiling in preparation for drilling.
You must mark two sides of your ceiling where the ropes need to go. For this purpose, you should use a pencil. Additionally, you need to mark the four corners of the shelves for drilling.
Step 03: Drill Holes in the Ceiling
As soon as you have made all of your markings, it is time to drill holes. Ensure that you are delicate when drilling the vents.
You will need a ladder to reach the ceiling. A drill will be required for this purpose. Please confirm that the vents are correctly drilled.
This is necessary in order to avoid drilling holes that are too big. If the vents you drilled are too large, the screws will not be able to support your multiple shelves, and they might fall down.
Step 04: Attach the Ceiling Mounting Angle Screw
Before attaching the mounting angles, you must ensure that all of them have been verified for accuracy. The first step is to insert the wall anchors into the vents.
Next, you need to fasten the ceiling mounting angle screws or toggle bolts to the wall anchors. To do this, you will require a screwdriver. Ensure that the screws are tight and secure enough to hold your angle.
The tightness of the screws will play a significant role in supporting your heavy shelves. The shelves should be able to hold up their weight.
Step 05: Drill Holes in the Shelves
Once the ceiling work has been completed, you can begin drilling the vents into the shelving unit. These vents should be drilled according to the rope’s diameter.
Four holes should be drilled in each corner of the shelf. They will serve as anchors for the ropes. Precise measuring and marking are necessary for these vents.
Step 06: Insert the Ropes Through the Holes
This is where you will be required to insert your ropes through the vents. Ensure that each shelf’s height is equal. You can check the height with a measuring tape.
Next, you must knot the ropes at the bottom of the shelf. This will give you a firm grip on them, and they will not slip off. Your knots must be secure and tight to avoid any accidents. It is important that the ropes are equally tight for each shelf.
Step 07: Hang the Shelves
You can now hang floating shelves to the mounting angle screw on the ceiling. To begin, hold the upper side ropes firmly in your hands. Next, climb the ladder to reach the ceiling.
Once you have reached the ceiling, attach both ropes to the angle screw. As soon as the shelf has been hung, you should ensure that it is balanced and equal on both sides.
Always ensure that the shelves are at a height that is comfortable for you. This will enable you to put items on the shelves easily.
Safety Precautions When Installing Floating Shelves

When you choose one or both of these methods for shelving applications, ensure that you follow safety precautions.
Therefore, you will be able to avoid any injuries or accidents that could have been prevented. When doing shelving applications, you need to know what safety precautions to take. Follow these precautions from the beginning to avoid any problems.
1. When drilling drywall, make sure that your finger does not get in the way of the drill. You should wear hand gloves while drilling. By doing so, you will avoid accidents.
2. Be sure that your fingers do not come into contact with the hammer when you are fastening the right wall anchor. In this way, you will ensure that you do not hit your fingers when using the hammer.
3. You must wear safety glasses and a mask when drilling ceilings. In this manner, you will avoid breathing in dust particles and avoiding falling particles in your eyes.
4. Be careful not to lose your balance while climbing a ladder. If you do not secure yourself well enough on the ladder, you will fall, resulting in serious injuries.
Conclusion:
Installing shelves instead of using brackets is not difficult if you know how to do it. After carefully reading this article, we hope that you have developed a better understanding of how to put up shelves without brackets.
Any one of the methods can be chosen based on your personal preference. You should always take safety precautions when installing shelving.
In this manner, you can avoid accidents, finally enjoy your newly installed shelves, and give your home a seamless and clean appearance.