WoodenuKnow.com is a participant in the Amazon Services LLC Associates Program, an affiliate advertising program designed to provide a means for sites to earn advertising fees by advertising and linking to Amazon.com and may earn from qualifying purchases.
Achieving an accurate and smooth 45-degree angle cut on a bandsaw can be intimidating, but it is possible for even novice users with the right preparation. Ensure success by having all of your tools in place before you start. Everything is within reach from there.
If you’ve ever been in a woodworking workshop, you know that there are two types of bandsaws, horizontal (portable) and vertical (commercial). Vertical bandsaws are used for larger projects, while horizontal bandsaws are used for smaller ones.
Cutting 45-degree angle wood with a bandsaw is easy. First, make sure you and the saw are ready to go. Then, adjust the angle setting on the saw and hold your wood firmly on the table. Mark where you need to cut, then begin cutting and finishing it. Lastly, check that everything looks good.
Here is a step-by-step guide to help you execute your next project accurately by following the above instructions.
Eight Easy Steps on How to Cut a 45 Degree Angle with a Bandsaw
Whether you consider yourself an experienced woodworker or just starting out, this tutorial has got the ideal solution for cutting precise 45-degree angles quickly and accurately. Follow our eight-step guide to get pro results in mere minutes:
Step 01: Prepare Yourself
Before taking on any saw-related projects, it is essential to take the necessary precautions for a safe and successful outcome. Safety gear such as hand gloves, eye goggles, and ear protection will protect you from potential danger when operating power tools.
Don’t forget sturdy shoes or boots, either. Protecting your feet can help make sure all goes according to plan.
Step 02: Prepare the Bandsaw
The next step is preparing the bandsaw for cutting at a 45-degree angle. This involves adjusting the blade tension and guide, so the blade is straight and running smoothly.
It is also essential to set the blade speed according to the type of wood you will be cutting; this will ensure that the cut proceeds without incident.
Step 03: Set the Angle
If your bandsaw has a tilting table, then this makes setting an angle much easier. Start by setting the table to a 45-degree angle, either by using a built-in protractor or by using a square or angle gauge for accuracy. Once you have set up the angle correctly, you can secure your wood piece.
Step 04: Secure the Wood
To ensure your wood remains firmly in place while cutting, use a clamp or vise attached securely to the bandsaw table. Ensure that both pieces are firmly held together and won’t move during any part of the cut process.
Also, double-check that all angles are still set correctly before proceeding with your project. A few seconds spent double-checking will save time in case anything needs readjusting.
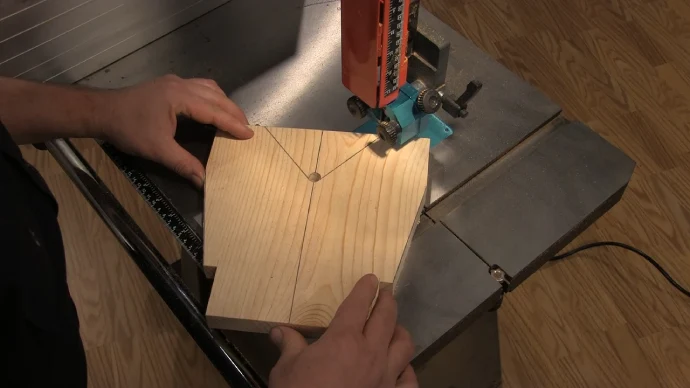
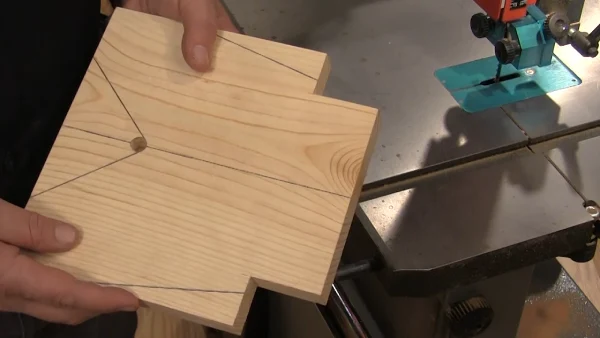
Step 05: Mark the Wood
To craft a perfect 45-degree angle, start by utilizing the carpenter’s square to draw an intersecting line that will act as your guide during cutting. Then use a pencil or marker to indicate precisely where you want the cut made on this newly drawn line.
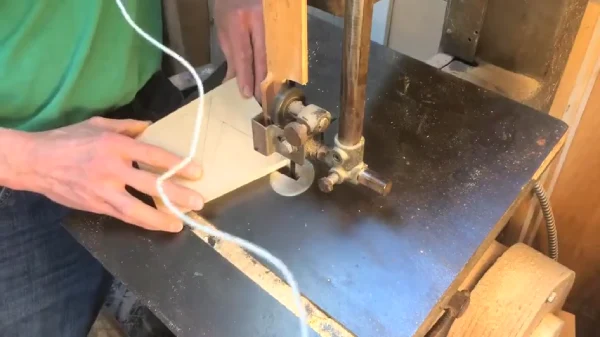
Step 06: Start the Cut
Before starting the cut, it is important to ensure that the bandsaw blade is properly aligned and tensioned. This can be done by adjusting the position of the blade guides and ensuring that they are parallel with each other and the blade.
Once this has been done, turn on the bandsaw and slowly lower the blade down onto your marked spot. As you feed the wood through, apply even pressure while keeping both hands away from the blade. Also, use a push stick to keep your hands away from danger while cutting.
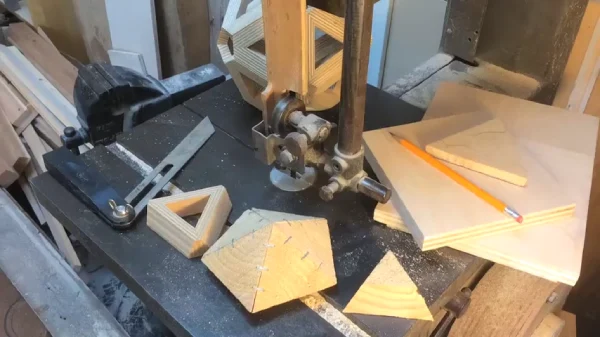
Step 07: Finish the Cut
When you have finished making your cut, turn off your saw and carefully remove any excess pieces of wood from its table. After removing all debris from around it, you should then take a deburring tool or sandpaper to smooth out any rough edges or burrs left behind by the bandsaw blade.
Step 08: Check for Accuracy
Once all of this is done, check your final cut against your carpenter’s square to ensure accuracy before taking it off of your saw table.
If everything matches up perfectly with what you had originally marked before cutting, then you will know that you have successfully achieved a 45-degree angle using only a bandsaw.
What Type of Blade Should I Use To Make a 45 Degree Angle Cut on a Bandsaw?
A bandsaw blade’s wide set, teeth per inch (TPI), thickness, and sharpness are the most significant factors to consider when making a 45-degree angle cut for wood. To get good results with angled cuts, make sure all the elements are present when you pick a bandsaw blade.
Look For a Blade with a Wider Set
To begin, you should look for blades with sets that are wider than usual to ensure an aggressive cutting action. Wider sets create larger spaces between each tooth which helps keep the saw from binding when cutting at an angle.
Generally speaking, a wider set is ideal for angled cuts as they are less likely to catch on the wood fibers while providing a clean cut.
Choose a Blade with Fewer Teeth per Inch
Blades with higher TPI can be too fine for angled cuts and can result in tearing or gouging of the wood surface instead of creating smooth lines. For 45-degree angle cuts on a bandsaw, look for blades with 8 to 14 TPI since they will remove more material during cutting and create smoother edges.
Consider the Blade Thickness
Using thicker blades improves stability when making angled cuts and reduces deflection during cutting operations. Thicker blades are sturdier and less likely to bend or vibrate, which helps maintain accuracy throughout the entire length of the cut line.
Use a Blade with a Sharp Edge
Finally, sharpness matters when selecting your bandsaw blade for angled cuts. Dull blades can cause burning or scorching along the length of your cut, which can ruin your workpiece.
Sharp edges make cleaner and smoother lines easier to sand down after cutting if needed. Using sharp blades also helps eliminate excess wood dust buildup around your tool, which could lead to binding or jamming during cutting actions.
Which Woods Are Suitable For 45 Degree Cuts on A Bandsaw?
Working with wood often requires precision cuts, and making 45-degree angle cuts on a bandsaw is no exception. Therefore, it is essential to know which types of wood are best for this type of cut.
Softwoods are the best choice for beginners when making 45-degree angle cuts on a bandsaw due to their straight grains and ease of cutting.
Species such as pine, cedar, and fir are lightweight yet strong enough for most applications. They can be cut quickly with minimal effort and produce a clean finish when adequately sanded.
Hardwoods like oak, maple, and walnut are well suited for 45-degree angle cuts on a bandsaw. However, they require more effort than softwoods because of their increased density and strength.
Special care should be taken when cutting these types of wood as they may require slower speeds or deeper tooth settings on the saw blade. Also, the saw blade may need to be replaced more frequently due to harder material dulling it faster than a softer wood.
Exotic Woods such as teak, rosewood, and ebony can produce high-quality 45-degree angle cuts on a bandsaw if done correctly. Although more costly than softwoods or hardwoods due to their unique grain patterns and colors, they can create beautiful projects that last a lifetime if cared for properly.
These types of woods can prove challenging to work with since they require special tools and techniques, such as setting deeper teeth in the saw blade or slowing down the speed of the saw to achieve an accurate cut with minimal waste material left over.
How Do I Properly Maintain My Bandsaw to Ensure Accurate and Safe Cuts?
Maintaining a 45-degree wood-cutting bandsaw is key to making accurate and safe cuts. To ensure your saw is performing optimally, it is essential to follow a few basic maintenance tips regularly.
Tips 01: Keep the Blade Sharp and Clean
First, before any cuts are made, visually inspect the blade for nicks or burrs. If these are present, use a file to remove them. And, to help maintain a proper edge on the blade, use a honing stone or diamond hone after each use.
Once the blade is sharpened, it is important to thoroughly clean it with a soft brush or cloth with soapy water. This will help eliminate built-up sawdust and other debris that can interfere with accurate cuts.
Tips 02: Tension the Blade Properly
When cutting with your 45° wood-cutting bandsaw, you must tension the blade properly so that it does not become damaged during use or produce inaccurate cuts.
To tension, your blade correctly, ensures that you have selected the correct size blade for your specific bandsaw. Then turn on the power switch and allow your saw to reach its full speed before cutting.
Next, using a tension gauge or listening for two distinct notes when plucking the blade like a guitar string, adjust your tension knob until it is at an appropriate level for both accuracy and safety purposes.
Tips 03: Check the Blade Alignment
- Start by unplugging your machine and checking all moving parts, like bearings and pulleys, for damage or wear.
- Ensure all fasteners are tight, including bolts that secure guides, wheels, and screws on covers, like hoods over motors or blade guards.
- Attach a feeler gauge between your guide posts and measure any gaps with a ruler to check whether they’re at right angles. To keep accuracy when cutting wood of different sizes/thicknesses, it’s important to adjust them if there’s more than a 0.002” gap.
Tips 04: Keep The Bandsaw Clean & Lubricate Moving Parts
The dirt that builds up can cause interference with the saw’s moving components, leading to inaccurate 45-degree cuts, which could create dangerous situations or even desired effects. There are a few key steps that help maintain the saw.
- Start using compressed air to blow off excess dust from all surfaces and then wipe down any residual dirt using an alcohol-based solution.
- All moving components should be oiled based on the manufacturer’s instructions.
- Lastly, inspect all belts for wear. If there are any signs of significant damage, replace them promptly before returning to your projects.
The Art of Cutting Perfect 45-Degree Angles with Your Bandsaw
Achieving a 45-degree angle with a bandsaw is attainable if the above steps are taken. Properly setting up and adjusting the saw before each use will lead to more accurate cuts when working on any material.
Furthermore, it’s important to remain consistently vigilant about safety while using your bandsaw to produce the desired results. With patience and practice, you’ll soon be able to make clean cuts every time.
So stay safe, do your preparation work, and get ready to start gaining confidence in your woodworking skills. Good luck.